


Introduction to Webflow’s SEO Features
In the world of website design and development, having a visually appealing site is just part of the equation. If your site can’t be found by search engines, it won’t reach your audience. This is where SEO (Search Engine Optimization) plays a crucial role. Webflow, a popular web design platform, not only allows users to create beautiful, functional websites without coding, but it also provides powerful built-in SEO tools to help your site rank higher in search results.
This article will guide you through the most important Webflow SEO settings and show you how to make the most of them to improve your site’s performance.
Meta Titles, Descriptions, and SEO Tags
One of the foundational aspects of SEO is ensuring that each page on your website has an optimized meta title and meta description. These elements not only help search engines understand the content of your page but also influence whether users click on your link in search results.
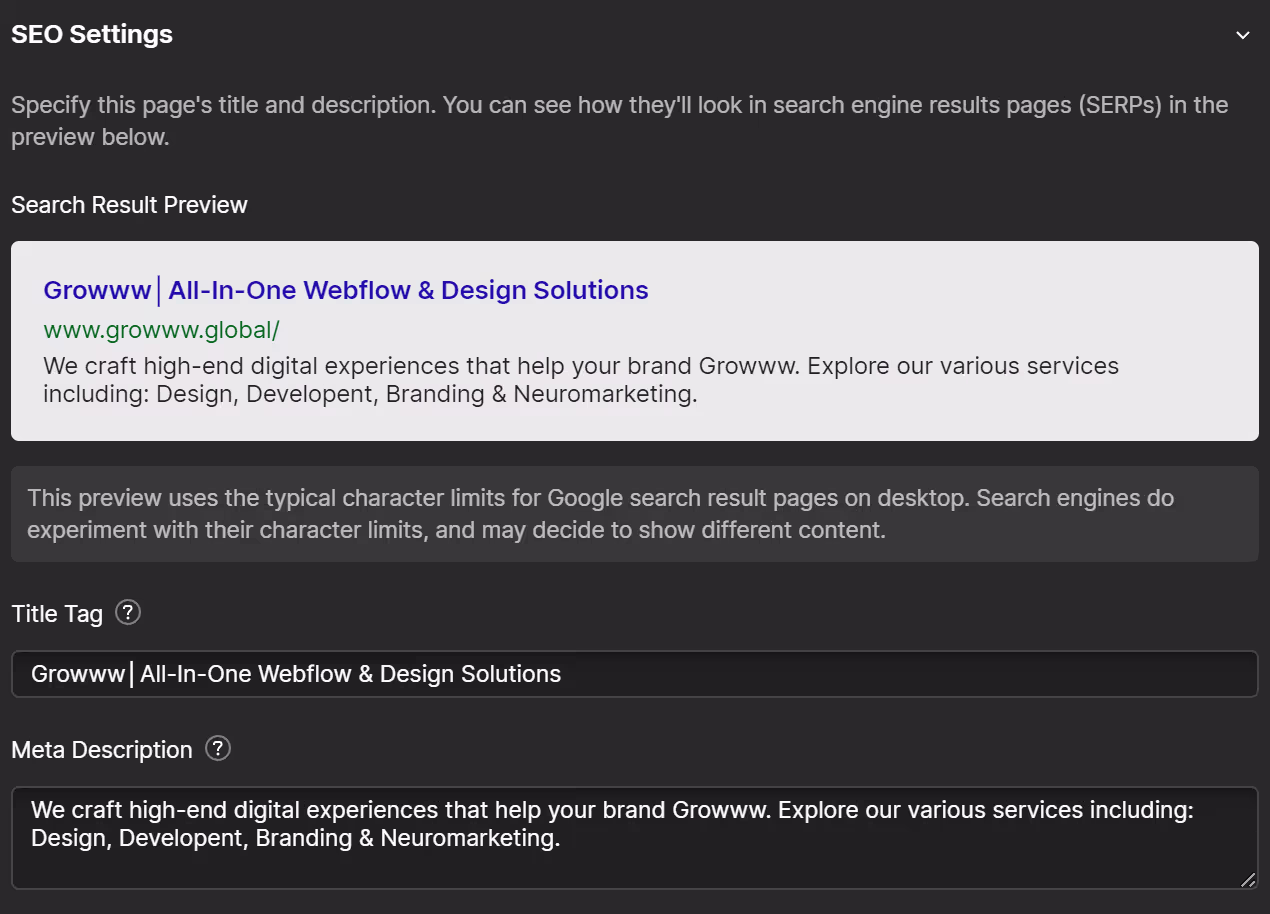
Meta Titles and Descriptions in Webflow
In Webflow, you can easily customize the meta title and description for each page. These fields are essential for defining how your content appears in search engine results pages (SERPs). A well-crafted meta title and description can improve click-through rates and boost your site’s ranking.
To edit these settings in Webflow:
- Navigate to the Page Settings.
- Under SEO Settings, you’ll find fields for the Title Tag and Meta Description.
- Enter a concise, keyword-optimized title (around 50-60 characters) and a description (up to 160 characters) that clearly represents the content of the page.
Using Page Code Fields for Custom SEO Tags
In addition to setting meta titles and descriptions, Webflow also offers the ability to add custom SEO tags using its Page Code Fields. These fields are particularly useful for adding structured data, such as Open Graph tags for social media previews or additional SEO tags that are not available in the default settings.
To use Page Code Fields:
- Go to the Page Settings for the specific page.
- Scroll to the Custom Code section.
- You can insert additional SEO tags like Open Graph, Twitter Card tags, or other relevant meta data directly into the Head or Footer sections of the page.
Custom tags can give search engines more detailed information about your page, further enhancing how it’s displayed in SERPs.
Canonical Tags and Preventing Duplicate Content
Duplicate content can be a significant issue for SEO, as search engines may struggle to determine which version of a page to rank. This can dilute the SEO value of your content and negatively affect your rankings. Canonical tags are essential for helping search engines understand the preferred version of a webpage, especially when there are multiple URLs that contain similar or identical content.
Setting Up Canonical Tags in Webflow
In Webflow, canonical tags are automatically generated for each page, which helps ensure that search engines like Google know which version of your content should be indexed. However, for specific use cases—such as when you have multiple variations of a URL or want to manually set the canonical URL—you can add your own custom canonical tags.
To set a custom canonical tag:
- Navigate to the Page Settings of the page where you want to add the tag.
- Scroll down to the Custom Code section.
- In the Head tag, you can manually insert the following code:
<link rel="canonical" href="https://yourdomain.com/preferred-page-url/" />
This ensures that search engines recognize the URL you specify as the canonical version, helping you avoid duplicate content issues and improving your SEO performance.
Global Canonical Tags
If you want to apply canonical tags across the entire website, Webflow also provides the flexibility to implement a global canonical tag. This can be done through Webflow’s Project Settings under the SEO tab. Setting a global canonical tag ensures that all pages on your site point to the correct version of your URLs, without needing to configure them individually.

Preventing Indexing of Staging URLs
One of the most common SEO issues for websites developed on platforms like Webflow is the accidental indexing of staging URLs. Staging environments are meant for testing, and if these URLs are indexed by search engines, they can cause confusion, dilute your SEO efforts, and impact rankings.
Why You Should Prevent Staging URL Indexing
Staging URLs are temporary versions of your site, usually hosted on Webflow’s default subdomain (e.g., yoursite.webflow.io). If these staging sites get indexed, search engines might display them in search results, confusing users and potentially diverting traffic away from your live site. Worse yet, search engines may penalize your SEO rankings for duplicate content if both staging and live versions are accessible.
How to Block Staging URLs from Being Indexed
Webflow makes it easy to prevent search engines from indexing your staging URLs by using the robots.txt file. You can customize this file to tell search engines not to crawl or index the staging version of your website.
Here’s how to do it:
- Go to Project Settings in Webflow.
- Navigate to the SEO tab.
- Scroll to the robots.txt section.
- Add the following lines to block all bots from indexing your staging URL:
User-agent: *
Disallow: /
This code ensures that search engines do not index any pages of your staging site.
By properly configuring your robots.txt file, you can avoid the risk of staging URLs appearing in search results and maintain the integrity of your SEO efforts.
Google Search Console Integration
Integrating your Webflow website with Google Search Console is a crucial step in monitoring and improving your SEO performance. Google Search Console helps you track how your website is performing in search results, identify indexing issues, and gain insights into how Google crawls and ranks your site.
Adding Google Search Console Verification Code
Before you can start using Google Search Console, you need to verify ownership of your Webflow site. This verification ensures that you have access to the search data for your domain and can track your website’s performance in Google.
Here’s how to add your Google Search Console verification code in Webflow:
- Sign in to Google Search Console.
- Add a new property by entering your Webflow site’s domain.
- Choose HTML tag as the verification method, and Google will provide you with a meta tag.
- Copy the provided meta tag code.
- In Webflow, navigate to your Project Settings.
- Under the SEO tab, paste the meta tag code into the Head Code section.
- Save your changes and return to Google Search Console to verify the ownership of your domain.
Once verified, you can access detailed information about how your site is performing in search results, including keyword rankings, click-through rates, and any issues that need attention.
Benefits of Google Search Console for SEO
Integrating Google Search Console allows you to:
- Monitor search traffic and performance: View which queries bring users to your site and track your website’s position in search results over time.
- Identify crawl errors: Google Search Console shows you if any pages are not indexed or if there are technical issues preventing Google from crawling them.
- Submit sitemaps: Ensure Google is aware of all your pages by submitting your Webflow-generated XML sitemap.
This integration gives you crucial visibility into your site’s performance, helping you adjust your SEO strategy and resolve any technical issues that may arise.
Clean URL Structure and Auto-Generated Sitemap
A well-organized URL structure and an automatically generated sitemap are essential for effective SEO. These elements help search engines easily understand the structure of your website, improving the likelihood of your pages being properly indexed and ranked.
Setting Up Clean URL Structures in Webflow
A clean and consistent URL structure is crucial for both SEO and user experience. Search engines prefer URLs that are simple, descriptive, and free of unnecessary parameters. In Webflow, you have full control over your page slugs, allowing you to create SEO-friendly URLs.
Best practices for URL structure include:
- Keep URLs short and descriptive: Use relevant keywords in your URLs that accurately describe the page’s content.
- Use hyphens instead of underscores: Search engines interpret hyphens as word separators, making it easier for them to read and understand the URL.
- Avoid special characters or unnecessary numbers: A clean URL should be easy to read for both users and search engines.
In Webflow, you can easily edit a page’s slug by:
- Navigating to the Page Settings for the specific page.
- Editing the URL Slug field under the SEO Settings.
- Ensure your URL slugs are concise and optimized for search engines.
Webflow’s Auto-Generated XML Sitemap
Webflow simplifies SEO management by automatically generating an XML sitemap for your website. An XML sitemap provides search engines with a roadmap of your site, ensuring they can easily find and index all the important pages.
To ensure your sitemap is up to date:
- In Webflow, go to your Project Settings.
- Under the SEO tab, you’ll find your auto-generated sitemap URL (usually at yourdomain.com/sitemap.xml).
- You can submit this sitemap to Google Search Console to help search engines crawl your site more efficiently.
By submitting the sitemap, you ensure that all of your pages are included in search engine indexes, which can improve the speed and accuracy of indexing.
Image Alt Text and Accessibility
Alt text (alternative text) is an important aspect of both SEO and accessibility. It provides a text description of images on your website, allowing search engines to understand the content of the image, while also ensuring that visually impaired users who rely on screen readers can access the same information. Proper use of alt text can improve your SEO rankings and enhance your website's overall usability.
Why Alt Text Matters for SEO and Accessibility
Alt text serves two critical purposes:
- SEO: Search engines can’t "see" images, so they rely on alt text to understand the content. Including keywords in your alt text, where appropriate, can help improve the relevance of your images in search engine results.
- Accessibility: Alt text ensures that users with disabilities can access your content. Screen readers use alt text to describe images to visually impaired users, making your website more inclusive and compliant with web accessibility standards.
Adding Alt Text in Webflow
Webflow makes it easy to add alt text to images. Here’s how:
- Select the image on your web page in Webflow's editor.
- In the Element Settings panel, find the Alt Text field.
- Enter a brief, descriptive text that accurately represents the content of the image.
Be sure that your alt text is both concise and meaningful, accurately describing the image while using relevant keywords where possible, without keyword stuffing.
Best Practices for Alt Text
- Keep alt text under 125 characters to ensure clarity.
- Avoid using phrases like "image of" or "picture of"—search engines and screen readers already know it's an image.
- Focus on describing the image's purpose or content rather than its visual details, unless the visual detail is essential to the message.
Using alt text effectively can enhance both your SEO and the accessibility of your website, making it easier for search engines to rank your content and for users to interact with your site.
Final Word
Mastering Webflow’s SEO settings is essential to optimizing your website for search engines and ensuring it reaches its full potential. By leveraging features like customizable meta titles and descriptions, canonical tags, clean URL structures, and proper alt text, you can boost your site's visibility while enhancing the user experience. Integrating tools like Google Search Console and Webflow’s automatic sitemap generation further helps search engines index your content efficiently.
By understanding and applying these key Webflow SEO settings, you can improve your site's rankings, attract more organic traffic, and create a solid foundation for long-term SEO success.


